Introduction to AngularJS - Filter, ngClass and 2-Way Data Binding
Learn how to use filters, ngClass and 2-way data binding in AngularJS.
Jennifer Bland
This is part two in my Introduction to AngularJS series.
In my first class I demonstrated how to create your first AngularJS application. The application was the start of website for our fictional Mandarian Spa company. The website provided a list of all the services offered by the spa including their price and whether or not that service was currently available.
In this lesson we are going to improve on our existing website by providing these services:
- Formatting Prices properly
- Change Availability column to only show Sold Out
- Add class if service is sold out
- Add a Filter to search by services
- Add two way data binding
Filters
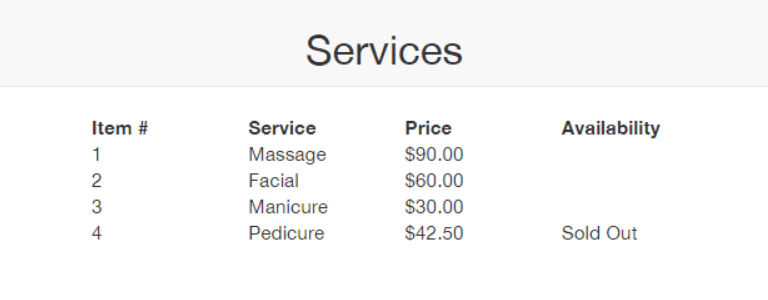
In our website it shows the price for each service. The formatting is not what we expect for a price. The last item has a price of $42.50 but it displays at $42.5.
To improve how the prices are displayed we can apply a filter to format the values as currency. Here is how to add the currency filter to our prices. Notice we also removed the leading $ sign since currency will provide this for us.
<div class="col-md-1">{{service.price | currency}}</div>
Expressions
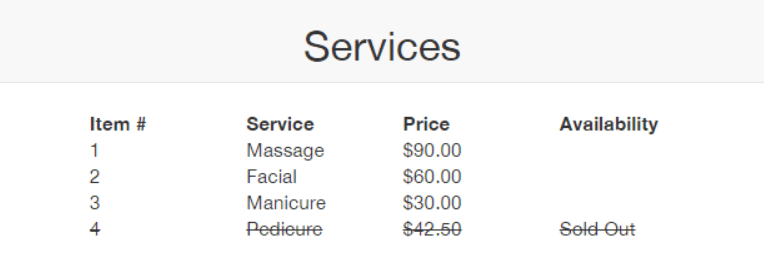
When you look at the Availability column it shows true or false. This is not the best way to display this information to our customers.
Expressions can contain any valid JavaScript code. We are going to take advantage of this to modify what is displayed in the availability column.
If an item is not available we want to display Sold Out. If it is available then we do not want to display anything in the availability column.
We will use JavaScript coding to alter what is displayed. Here is the JavaScript code that we add.
<div class="col-md-1">{{ (!service.available) ? "Sold Out" : ""}}</div>
With that change our website now looks like this.
ng-if, ng-show and ng-hide
I am going to cover them so that you are familiar with alternatives that you can use.
Ng-show and ng-hide will either show or hide an element based on the value assigned to it. If we wanted to duplicate the Sold Out showing in the availability column we could have used either one of these options.
<div class="col-md-1" ng-show="!service.available">{{"Sold Out"}}</div>
<div class="col-md-1" ng-hide="service.available">{{"Sold Out"}}</div>
There is one big difference between using either ng-show and ng-hide and ng-if. If you use ng-show or ng-hide then the content is still present in the DOM even if it is not visible on the website With ng-if the item is either shown in the DOM if the value is true or is completely removed from the DOM if the value is false.
Here is how the code would look if using ng-if.
<div class="col-md-1" ng-if="!service.available">{{"Sold Out"}}</div>
ng-class
First we will need to add a stylesheet to our application. In that stylesheet we will have the following code added for a class called strike.
.strike {
  text-decoration: line-through;
}
Next we are going to dynamically add this class to our Services table if a service is not available. Here is the code that we need to add to each div.
ng-class="{strike: !service.available}"
What this code does is to get the value of service.available which will be either true or false. If a service is not available it will have a value of false. We use the ! character to reverse this value and make it true. When it is true then the class strike will be applied to the div. Here is what our website looks like now.
2 Way Data Binding
Expressions are re-evaluated when their property changes. Angular keeps a track of the value stored in every expression. If the value of the expression changes, Angular will automatically compare it to the previous value. If the values are different the Angular will automatically insert the new value into the application.
With traditional websites if you wanted to change the value in a field you would have to have the server send down a new page with the new value to be displayed. Or you had to write an extended amount of JavaScript that watched for changes to a field and when a change occurred then update the field with the new value.
With Angular you do not have to write a single line of JavaScript to provide the same functionality.
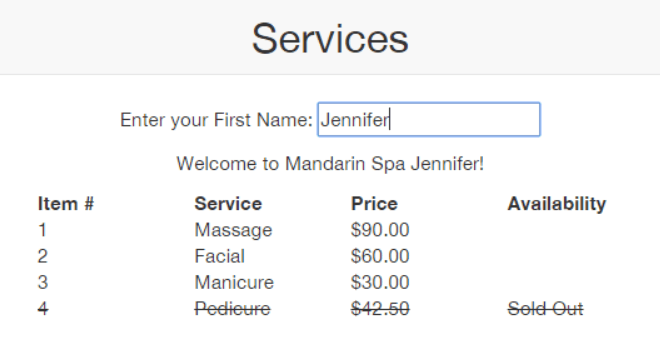
To demonstrate 2 way data binding, we are going to put an input on the services page asking users to enter their name. As they enter their name we are going to display a welcome message to them that utilizes their name.
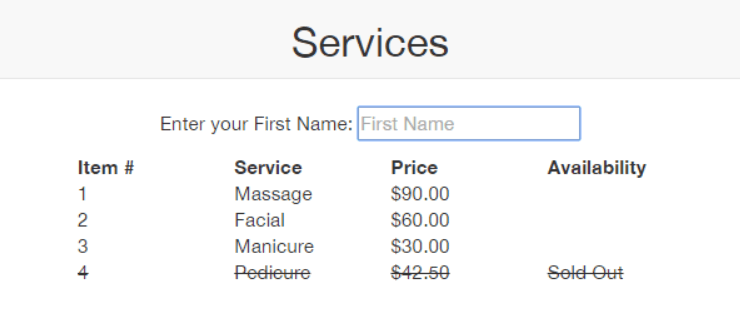
The first step in 2 way data-binding is to use the ng-model to bind and input field. I have created an input field and assigned it the ng-model directive with the name of firstName. On the next line I have added a welcome message that displays the user's first name. This field is hidden with the ng-hide directive and will not be shown until the user types in the firstName field. Here is the code that I have added.
  <div class="container-flud text-center">
    <p>Enter your First Name: <input type="text" ng-model="firstName" placeholder="First Name"></p>
    <p ng-hide="!firstName">Welcome to Mandarin Spa {{ firstName }}!</p>
  </div>
With this code added here is what the website looks like with the new input field.Notice that the welcome message is not being displayed since the user has not typed anything into the firstName field yet.
Once a user starts typing into the field then the Welcome message is displayed as shown below.